
Imagine a dessert that captures the sunshine of a July afternoon in every bite. Strawberry Bliss Icebox Cake does exactly that—layers of fluffy whipped cream, sweet strawberries, and crunchy graham crackers that set into a silky, no‑bake masterpiece.
What makes this treat truly special is its balance of textures: the crisp cracker base soaks just enough moisture to become tender, while the fresh strawberries add a burst of natural sweetness that never feels artificial.
This cake is perfect for anyone who loves light yet indulgent desserts—kids, busy parents, or anyone looking for a crowd‑pleasing finish to a summer barbecue or a casual brunch.
The process is delightfully simple: whisk a creamy filling, layer fruit and crackers, then let the refrigerator do the heavy lifting. In just a few minutes of assembly and a few hours of chilling, you’ll have a stunning dessert ready to serve.
Why You'll Love This Recipe
Zero Oven Required: No baking means less heat in the kitchen and a quicker turnaround, perfect for hot summer days when you’d rather stay cool.
Fresh Fruit Forward: Ripe strawberries provide natural sweetness and a vibrant color that makes the cake look as good as it tastes.
Customizable Layers: You can add extra layers, swap in other berries, or even drizzle chocolate for a personalized twist.
Make‑Ahead Friendly: The cake improves after a few hours in the fridge, giving you a stress‑free dessert that’s ready when guests arrive.
Ingredients
For this icebox cake, the star ingredients are fresh strawberries and a light, airy whipped cream. The graham crackers form a sturdy yet tender foundation that absorbs just enough strawberry juice to stay soft without becoming soggy. A touch of vanilla and powdered sugar sweetens the cream without overpowering the fruit, while a pinch of salt balances the flavors. Together these components create a harmonious dessert that feels both indulgent and refreshing.
Graham Cracker Base
- 1 ½ cups (about 12) graham cracker squares
- 3 tbsp unsalted butter, melted
Cream Filling
- 2 cups heavy whipping cream, chilled
- ¼ cup powdered sugar
- 1 tsp pure vanilla extract
- Pinch of fine sea salt
Strawberry Layer
- 4 cups fresh strawberries, hulled and sliced
- 2 tbsp granulated sugar (optional, for extra sweetness)
Topping (Optional)
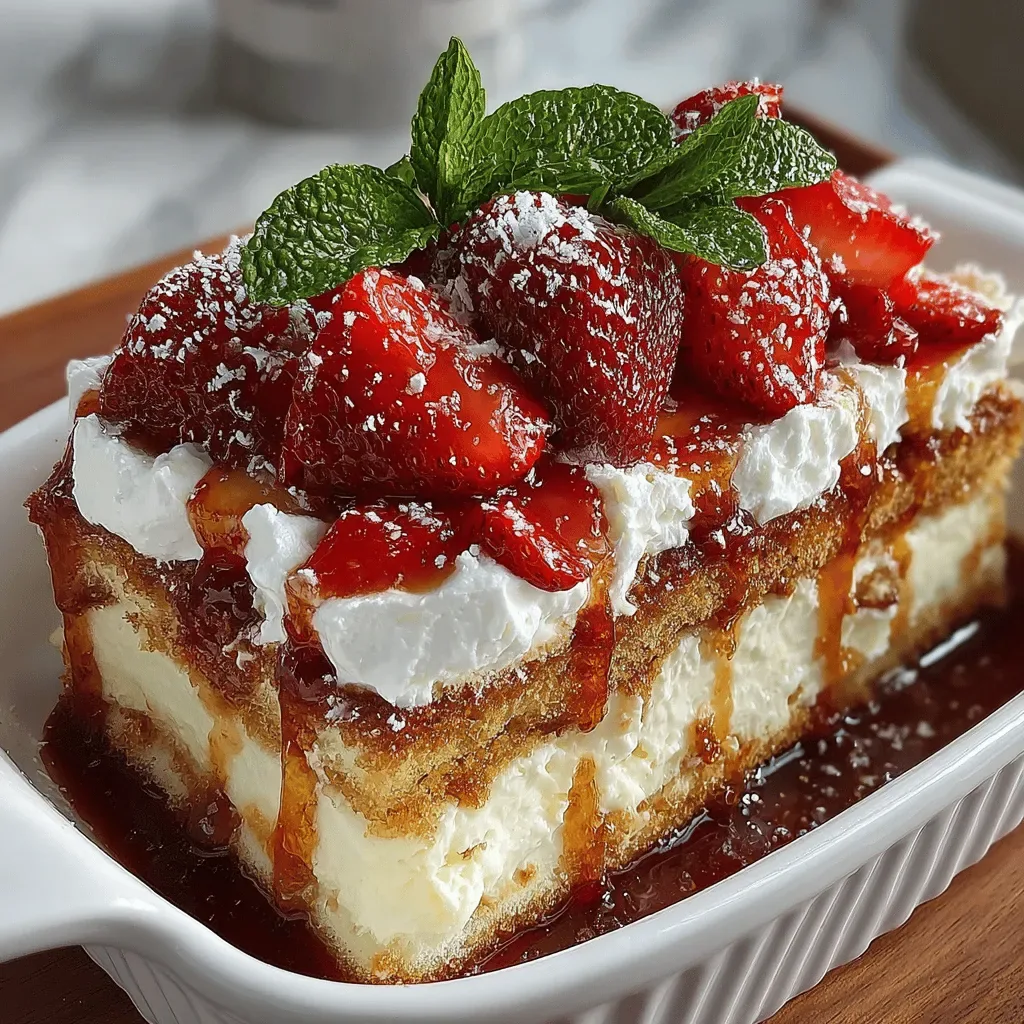
- Fresh mint leaves for garnish
- Additional sliced strawberries for visual flair
The butter‑moistened graham crackers create a buttery, slightly crunchy base that softens just enough to meld with the creamy layers. Heavy cream, when whipped with sugar and vanilla, forms a light yet stable filling that holds its shape during chilling. Fresh strawberries contribute natural juices that gently permeate the cake, keeping each bite moist while delivering a burst of bright, fruity flavor. The optional mint adds a refreshing aroma that lifts the entire dessert.
Step-by-Step Instructions
Preparing the Graham Cracker Base
Begin by placing the graham cracker squares in a large zip‑top bag and crushing them with a rolling pin until they resemble coarse sand. Transfer the crumbs to a mixing bowl, drizzle the melted butter over them, and stir until every crumb is lightly coated. This butter‑infused mixture will hold together once pressed, forming a stable foundation for the cake.
Whipping the Cream Filling
In a chilled mixing bowl, combine the heavy whipping cream, powdered sugar, vanilla extract, and a pinch of sea salt. Using a handheld mixer on medium‑high speed, whip the mixture until soft peaks form—when you lift the whisk, the cream should hold a gentle mound that slightly folds over. This texture ensures the filling is airy but sturdy enough to support the fruit layers.
Assembling the Cake
- Press the Base. Evenly spread half of the buttered graham crumbs into the bottom of a 9‑inch springform pan, pressing firmly with the back of a spoon or the bottom of a glass. The layer should be compact and level.
- Layer Strawberries. Arrange a generous layer of sliced strawberries over the crumb base. Lightly sprinkle the optional granulated sugar to draw out extra juice, then let sit for 5 minutes.
- Add Cream. Spoon half of the whipped cream over the strawberries, spreading it with an offset spatula until smooth. The cream creates a barrier that prevents the crumbs from becoming soggy.
- Repeat Layers. Sprinkle the remaining graham crumbs over the cream, followed by the second batch of strawberries and the final dollop of whipped cream. Smooth the top and tap the pan gently to settle any air pockets.
- Finish & Chill. Cover the pan with plastic wrap and refrigerate for at least 4 hours, preferably overnight. This chilling time allows the crumbs to absorb moisture, the flavors to meld, and the cake to set firmly for clean slicing.
Garnish and Serve
Once chilled, remove the springform ring, then garnish the top with a handful of fresh mint leaves and a few extra strawberry slices for a pop of color. Slice with a hot, wet knife for clean edges, and serve immediately for the best texture.
Tips & Tricks
Perfecting the Recipe
Use Cold Cream. Keep the heavy cream and mixing bowl chilled; this speeds up whipping and yields a more stable, airy filling.
Dry the Berries. Pat sliced strawberries with a paper towel after washing to remove excess moisture that can make the cake soggy.
Flavor Enhancements
For an extra layer of flavor, drizzle a tablespoon of aged balsamic reduction over the top strawberries before the final cream layer. A splash of orange liqueur mixed into the whipped cream adds a subtle citrus note that brightens the entire dessert.
Common Mistakes to Avoid
Avoid over‑whipping the cream; once stiff peaks form, stop immediately to prevent a grainy texture. Also, don’t skip the chilling step—without sufficient time in the fridge, the crumbs won’t soften and the cake will fall apart when sliced.
Pro Tips
Layer Thinly. Keep each crumb and cream layer thin (about ¼‑inch) to ensure even moisture distribution and a cohesive final texture.
Use a Springform Pan. This pan lets you lift the cake out in one piece, preserving its delicate layers and making serving a breeze.
Pre‑Slice Strawberries. Slice berries slightly thinner than a coin; thinner slices integrate better and release just enough juice to soften the crumbs without sogginess.
Warm the Knife. Run your slicing knife under hot water, dry, then cut. This technique yields clean, crisp slices without dragging the soft layers.
Variations
Ingredient Swaps
Swap graham crackers for vanilla wafers or digestive biscuits for a different flavor profile. Replace strawberries with a mix of raspberries, blueberries, and blackberries for a berry medley. For a tropical twist, use mango slices and coconut‑flavored whipped cream.
Dietary Adjustments
For a gluten‑free version, choose certified gluten‑free graham‑style crackers or almond flour biscuits. Vegan diners can substitute coconut cream (chilled and whipped) for dairy cream and use maple syrup instead of powdered sugar. Keto lovers can replace the sugar with a low‑carb sweetener and use crushed pork rinds as a low‑carb crumb base.
Serving Suggestions
Pair the cake with a dollop of lemon‑infused whipped ricotta for tangy contrast, or serve alongside a chilled glass of Prosecco for an elegant brunch. A side of fresh mint‑scented fruit salad adds extra brightness and balances the richness of the cream.
Storage Info
Leftover Storage
Keep any leftovers covered tightly with plastic wrap or transferred to an airtight container. Store in the refrigerator for up to 3 days; the cake will continue to soften, making each bite even more luscious. For longer storage, freeze individual slices wrapped in parchment and then a freezer bag for up to 2 months.
Reheating Instructions
This dessert is best enjoyed cold, but if you prefer a slightly warmed version, let a slice sit at room temperature for 15 minutes before serving. For a gentle warm‑through, place a slice on a microwave‑safe plate, cover loosely, and heat on low power for 20‑30 seconds—just enough to take the chill off without melting the cream.
Frequently Asked Questions
This Strawberry Bliss Icebox Cake delivers bright summer flavors with minimal effort, making it an ideal make‑ahead dessert for any gathering. By following the step‑by‑step guide, you’ll achieve perfectly soft layers, airy cream, and a beautiful strawberry‑studded finish. Feel free to experiment with fruit swaps or garnish ideas—your creativity is the only limit. Slice, serve, and enjoy every cool, sweet bite!


